Order Tracking
English
English
PKR
All
Audio iCs
Cables
Charging iCs
CPU iCs Chips
Display iCs
Heating Tools
Holders
LCD Tools
MAANT Tools
Meters
Microscope Tools
Network iCs
Other
Power iCs
Wifi iCs
All Products
AMAOE Fix 2
Amaoe Tools
Battery Connector
Double Layer
Fixtures
iCs Android
iCs iPhone
iPhone Geve Sim
MEGA idea
Mega iDea Tools
MI
MTK
Other Tools
Parts
Display Connectors
Qianli Tools
Qualcom
RELIFE Tools
Resistors
Samsung
Stencils
Tools
Search
Sign In
Account
0
Total
₨
0
No products in the cart.
Free Shipping on All Orders Over RS10000
All Departments
All Products
iCs iPhone
iP6 Series
iP7 Series
iP8 Series
iPX Series
iP11 Series
iP12 Series
iP13 Series
iP14 Series
iPad Etc
iPad Etc Series
iCs Android
Power iCs
Charging iCs
Audio iCs
Network iCs
Display iCs
RF iCs
Other iCs
Tools
Amaoe Tools
RF4 Tools
Sunshine Tools
Other Tools
Parts
Original Mic
Original Power Button
Display Connectors
Battery Connector
Stencils
iPhone
MTK
Qualcom
Huawei
Exynos
MI
Samsung
SPD
RAM
MEGA idea
Double Layer
Fixtures
AMAOE Fix 1
AMAOE Fix 2
AMAOE Fix 3
Mijing Fix
Home
iCs Android
Power iCs
Charging iCs
Display iCs
Audio iCs
Wifi iCs
Network iCs
RF iCs
CPU iCs Chips
Other iCs
Resistors
Tools
YCS Tools
Tool List
Flux Paste
Solder Paste
Solder Wick
Tweezers
Brush
Bit/Tips
Knife
Holders
Cables
USB Charger
LCD Tools
Microscope Tools
Reballing iPhone
Rebaling Android
Heating Tools
Meters
Amaoe Tools
RF4 Tools
RELIFE Tools
2UUL Tools
Qianli Tools
Mega iDea Tools
Sunshine Tools
Mijing Tools
MAANT Tools
AY108 Face ID Box
Mechanic
Koocu
Forward
Other Tools
Parts
Original Charging Jack
Original Power Button
Original Mic
Display Connectors
Battery Connector
Stencils
iPhone
MTK
Qualcom
SPD
Exynos
RAM
Samsung
MI
Huawei
Double Layer
MEGA idea
Single Stencils
Other
Fixtures
AMAOE Fix 1
AMAOE Fix 2
AMAOE Fix 3
Martview
Solder Wick
Flux Paste
Solder Paste
Mijing Fix
Other Fixtures
Blog
Contact
Order Tracking
English
English
PKR
0
Total
₨
0
No products in the cart.
Free Shipping on All Orders Over RS10000
Home
Shop
Filter Products
Sort by popularity
Sort by average rating
Sort by latest
Sort by price: low to high
Sort by price: high to low
Show:
16 Items
32 Items
48 Items
64 Items
Showing 1–16 of 29 results
Sorted by latest
Clear filters
Other iCs
Add to Wishlist
Add to Wishlist
FORWARD RMB EDGE All In One OCA Lamination Machine
₨
330,000
Add to cart
Add to Wishlist
Add to Wishlist
Add to Wishlist
Add to Wishlist
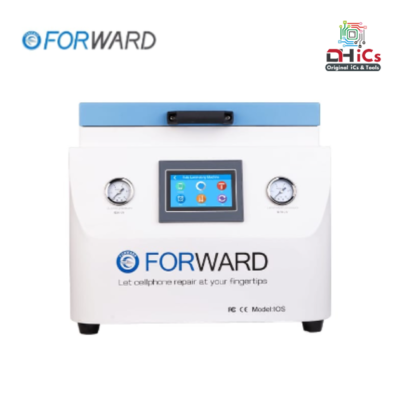
FORWARD IOS 16 inches All In One OCA laminating Machine for LCD Repair and Glass Refurbishment
₨
185,000
Add to cart
Add to Wishlist
Add to Wishlist
Add to Wishlist
Add to Wishlist
FORWARD SIRI Automatic OCA Lamination Machine
₨
165,000
Add to cart
Add to Wishlist
Add to Wishlist
Add to Wishlist
Add to Wishlist
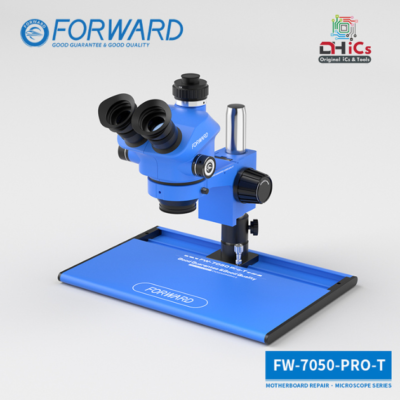
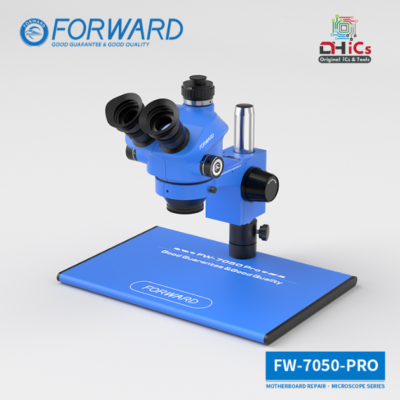
Forward Original Microscope FW 7050 Pro T
₨
80,000
Add to cart
Add to Wishlist
Add to Wishlist
Add to Wishlist
Add to Wishlist
CEO-2MAX
₨
480,000
Add to cart
Add to Wishlist
Add to Wishlist
Add to Wishlist
Add to Wishlist
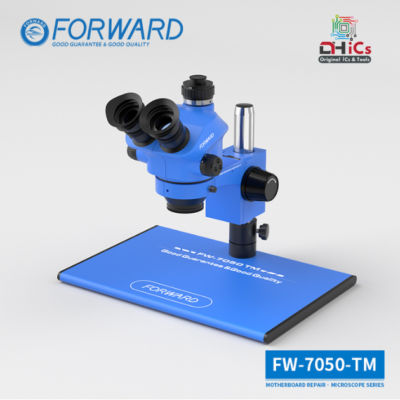
Forward Original Microscope FW 7050 TM
₨
65,000
Add to cart
Add to Wishlist
Add to Wishlist
Add to Wishlist
Add to Wishlist
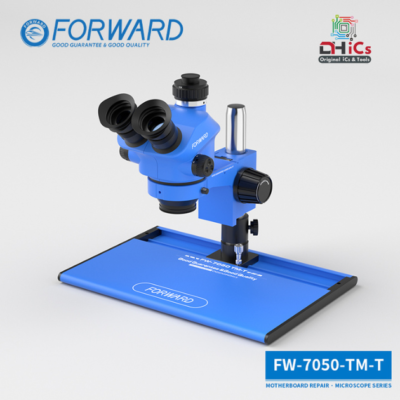
Forward Original Microscope FW 7050 TM T
₨
75,000
Add to cart
Add to Wishlist
Add to Wishlist
Add to Wishlist
Add to Wishlist
FORWARD Global First New RMB-3 Plus All-Mighty OCA Laminating Machine 220V/110V for iPhone 13 LCD&OLED Screen Repairing
₨
380,000
Add to cart
Add to Wishlist
Add to Wishlist
Add to Wishlist
Add to Wishlist
Microscope FW 7050 Pro
₨
70,000
Add to cart
Add to Wishlist
Add to Wishlist
Add to Wishlist
Add to Wishlist
Forward RMB-1 Lamination Machine
₨
275,000
Add to cart
Add to Wishlist
Add to Wishlist
Add to Wishlist
Add to Wishlist
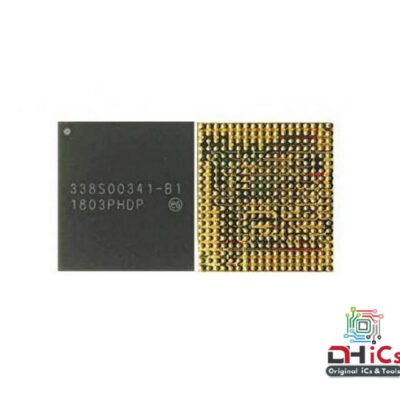
iPhone X big power ic 338S00341 Refurbish
₨
500
Add to cart
Add to Wishlist
Add to Wishlist
Add to Wishlist
Add to Wishlist
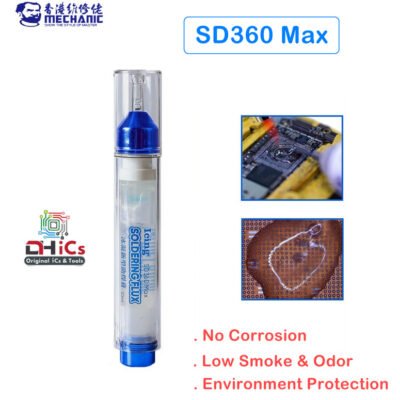
Solder Flux Paste Mechanic SD360 Max Icing Flux
₨
1,900
Read more
Add to Wishlist
Add to Wishlist
Add to Wishlist
Add to Wishlist
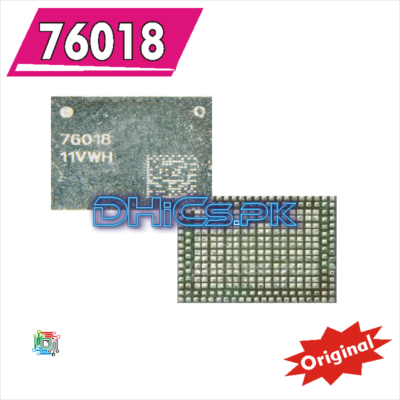
iPhone XS XR MAX power amplifier IC 76018
₨
600
Add to cart
Add to Wishlist
Add to Wishlist
Add to Wishlist
Add to Wishlist
iPhone XS XR MAX power amplifier IC 2018-15
₨
600
Add to cart
Add to Wishlist
Add to Wishlist
Add to Wishlist
Add to Wishlist
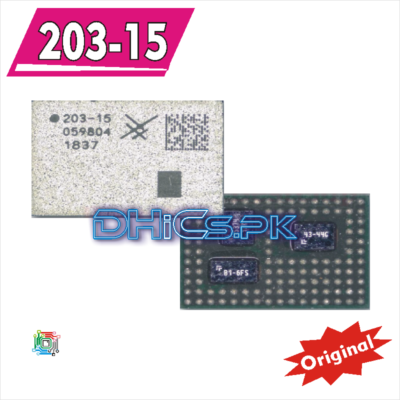
iPhone XS XR MAX power amplifier IC 203-15
₨
600
Add to cart
Add to Wishlist
Add to Wishlist
Add to Wishlist
Add to Wishlist
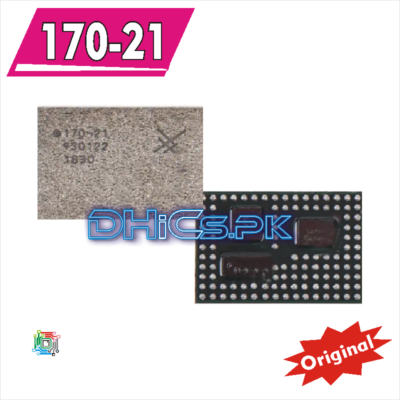
iPhone XS XR MAX power amplifier IC 170-21
₨
600
Add to cart
Add to Wishlist
Add to Wishlist
1
2
Filter Products
Archives
February 2025
January 2025
December 2024
November 2024
October 2024
September 2024
August 2024
July 2024
June 2024
May 2024
April 2024
January 2024
November 2023
October 2023
September 2023
August 2023
July 2023
June 2023
May 2023
April 2023
March 2023
February 2023
January 2023
October 2022
April 2022
August 2021
November 2020
September 2019
Product Categories
2UUL Tools
AMAOE Fix 1
AMAOE Fix 3
Audio iCs
AY108 Face ID Box
Bit/Tips
Brush
Cables
Charging iCs
CPU iCs Chips
Display iCs
Flux Paste
Heating Tools
Holders
Huawei
Knife
LCD Tools
MAANT Tools
Meters
Microscope
Microscope Tools
Mijing Tools
Network iCs
Other
Other iCs
Power iCs
Qualcomm
RF4 Tools
Single Stencils
Solder Paste
Solder Wick
Sunshine Tools
Wifi iC
Wifi iCs
AMAOE Fix 2
Amaoe Tools
Battery Connector
Double Layer
Exynos
Fixtures
AMAOE Fix 1
AMAOE Fix 2
AMAOE Fix 3
Mijing Fix
Martview
Other Fixtures
Flux Paste
Solder Paste
Solder Wick
iCs Android
Power iCs
Charging iCs
Audio iCs
Network iCs
Display iCs
RF iCs
Other iCs
Resistors
Wifi iCs
CPU iCs Chips
Emmc Chip
iCs iPhone
iP12 Series
iP11 Series
iP7 Series
iP13 Series
iP8 Series
iPX Series
iP6 Series
iPad Etc
iP14 Series
iPad Etc Series
Nand Chip
Nand Chip
iPhone
iPhone Geve Sim
MEGA idea
Mega iDea Tools
MI
MTK
Other Tools
Parts
Original Mic
Original Power Button
Battery Connector
Original Charging Jack
Display Connector
Display Connectors
Qianli Tools
Qualcom
RELIFE Tools
Resistors
Samsung
SPD
Stencils
iPhone
Qualcom
MTK
SPD
Small iCs
Huawei
Stencilss
MI
Samsung
Exynos
Other
RAM
Double Layer
MEGA idea
Single Stencil
Tools
Amaoe Tools
RF4 Tools
Sunshine Tools
Other Tools
RELIFE Tools
AY108 Face ID Box
Mijing Tools
2UUL Tools
Qianli Tools
Mega iDea Tools
MAANT Tools
Tool List
Flux Paste
Solder Paste
Tweezers
Holders
Brush
Bit/Tips
Cables
Solder Wick
Knife
USB Charger
Microscope Tools
Reballing iPhone
Rebaling Android
Meters
Heating Tools
LCD Tools
Mechanic Tools
Mechanic
Forward
Koocu
YCS Tools
YCS Tools
Filter by price
Min price
Max price
Filter
Price:
—
Product Status
In Stock
On Sale
All
Audio iCs
Cables
Charging iCs
CPU iCs Chips
Display iCs
Heating Tools
Holders
LCD Tools
MAANT Tools
Meters
Microscope Tools
Network iCs
Other
Power iCs
Wifi iCs
All Products
AMAOE Fix 2
Amaoe Tools
Battery Connector
Double Layer
Fixtures
iCs Android
iCs iPhone
iPhone Geve Sim
MEGA idea
Mega iDea Tools
MI
MTK
Other Tools
Parts
Display Connectors
Qianli Tools
Qualcom
RELIFE Tools
Resistors
Samsung
Stencils
Tools
Search
Home
Filter
Search
Wishlist
Account
Hide similarities
Highlight differences
Select the fields to be shown. Others will be hidden. Drag and drop to rearrange the order.
Image
SKU
Rating
Price
Stock
Availability
Add to cart
Description
Content
Weight
Dimensions
Additional information
Click outside to hide the comparison bar
Compare